Maintaining optimal oral hygiene involves brushing twice daily for at least two minutes each session, which serves as the initial step in safeguarding the health of your teeth and gums. However, even with diligent brushing, it’s impossible to thoroughly clean the interdental spaces. Consequently, the American Dental Association advocates for daily flossing to effectively eliminate food particles and plaque—the sticky bacterial film on teeth that poses risks of cavities and gum disease.
Plaque harbors cavity-causing bacteria, thriving on residual food remnants in the mouth. Particularly fond of sugary substances, these bacteria metabolize them, generating acids that can erode the protective enamel layer of teeth, thus initiating the process of tooth decay.
If left uncleansed by brushing or flossing, plaque can solidify into tartar or calculus, forming a rough deposit along the gum line. This accumulation heightens the risk of gum disease. Once tartar develops, professional intervention by a dentist is necessary for its removal, showing the preventive importance of daily flossing to mitigate plaque buildup.
Should I floss before or after brushing my teeth?
As long as you floss meticulously, the timing of your flossing routine is not critical; the key is to establish a daily flossing habit. Select a time of day when you can allocate some extra attention to your dental care. If you find yourself too fatigued in the evenings, consider flossing in the morning or after lunch.
It’s important to note that flossing should not cause discomfort. Excessive force during flossing can potentially harm the tissue between your teeth, while being overly gentle may leave food particles or plaque behind. While some discomfort may initially be experienced during flossing, with practice, you’ll learn to apply the appropriate amount of pressure. If you continue to experience pain while flossing, consult your dentist.
Steps for Flawless Flossing
Here are five essential steps for achieving impeccable flossing technique:
1. Begin by breaking off approximately 18 inches of dental floss. Wrap the majority of the floss around one of your middle fingers, and wind the remaining portion around the corresponding finger of your opposite hand. This finger will gradually take up the floss as you proceed.

2. Firmly grasp the floss between your thumbs and forefingers, ensuring a secure hold.

3. With a gentle, rubbing motion, guide the floss between your teeth. Avoid snapping the floss into the gums, as this can cause discomfort.
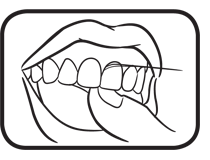
4. Once the floss reaches the gum line, contour it into a C shape against one tooth. Carefully slide it into the space between the gum and the tooth.

5. Maintain a firm hold on the floss against the tooth, positioning it slightly away from the gums. Employ a gentle up-and-down motion to softly rub the side of the tooth, adhering to its shape. Repeat this process for all teeth, both upper and lower, and remember to floss the back side of your rearmost teeth located at the back of your mouth.

These steps, when followed diligently, ensure effective and thorough flossing, promoting optimal oral hygiene.